Managing Projects
Configuring Your Project
Once you have added your project, you can use the Arranger Admin UI to configure the specific UI components and properties that will appear in the front-end data portal.
Configuring Extended Field Properties
Certain extended properties of your Elasticsearch field mappings can be configured.
To configure the extended properties:
- Go to the Arranger Admin UI at
localhost:8080.
- From the Project versions list, click the project you wish to configure. A list of Elasticsearch indices associated to the project appears.
- Click the Elasticsearch index name you wish to configure.
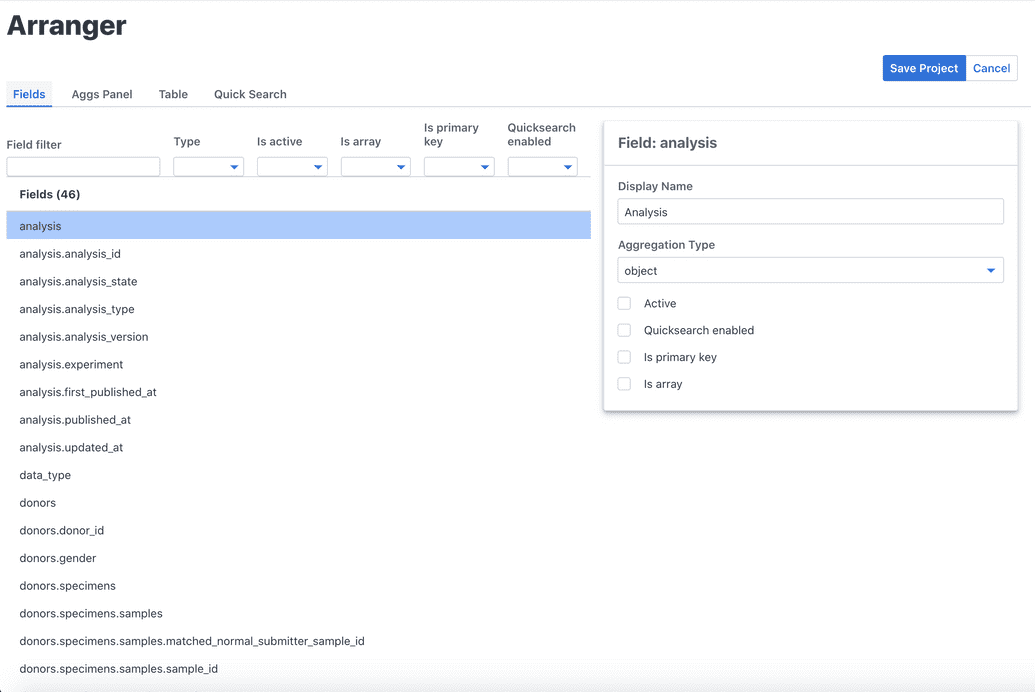
- Click the Fields tab. The list of all fields from your index mapping appears:
- For each field, you can configure the following as you deem necessary:
| Config | Description |
|---|---|
| Display Name | Name of the field to display in the data portal. This reflects in the facet panel and the results table. We recommend you update these names, since otherwise, the default ES index field name will appear. |
| Aggregation Type | Type of aggreggation used to count or sum up values for the field. Select a value from the drop-down. The values are types supported by Elasticsearch. The data portal may need to know the aggregation type so that it can render UI components in a certain way or behaviour. For example, for dates, the UI may need to know so that it can display things in a certain format or control. |
| Active | DO NOT USE: Not currently supported |
| Quicksearch enabled | If enabled, the field will be enabled for quick search in the facet panel (the quick search text box with the magnifying glass icon). |
| Is primary key | If enabled, this indicates if the field is the primary key for an entity in the Elasticsearch index. The data portal may need to know this in order to perform some logic or operations. Hence, the admin must mark it as a primary key here so that the data portal knows. |
| Is array | If enabled, this indicates if the field is an array. Elasticsearch does not support this information. Hence, if the data portal needs to know if a field is an array or not, it cannot rely on the ES mapping. Instead, the admin must mark it as an array in Arranger so that the data portal knows. |
- Click Save Project.
Configuring the Facet Panel
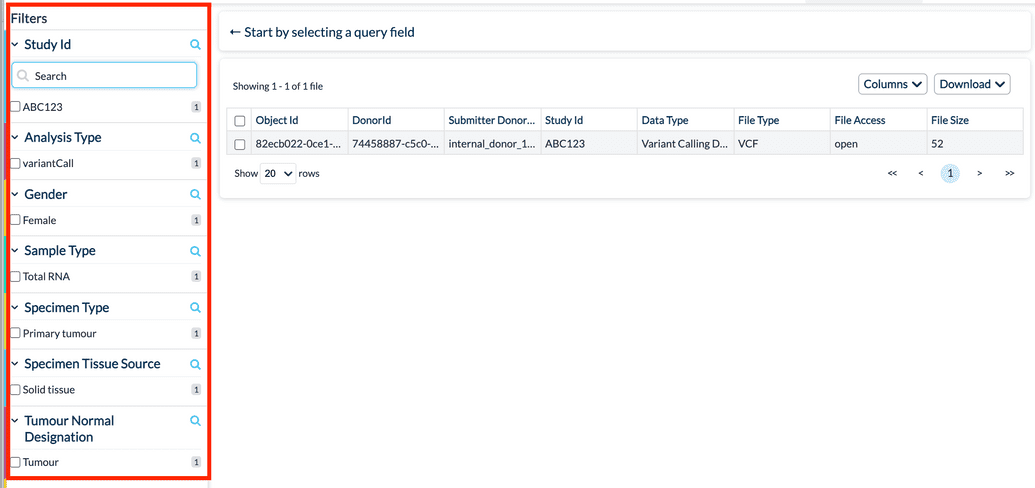
The facet panel is the UI control in the data portal where the search filters and aggregations appear. Here is an example from a demo portal:
To configure properties of the facet panel:
- Go to the Arranger Admin UI at
localhost:8080.
- From the Project versions list, click the project you wish to configure. A list of Elasticsearch indices associated to the project appears.
- Click the Elasticsearch index name you wish to configure.
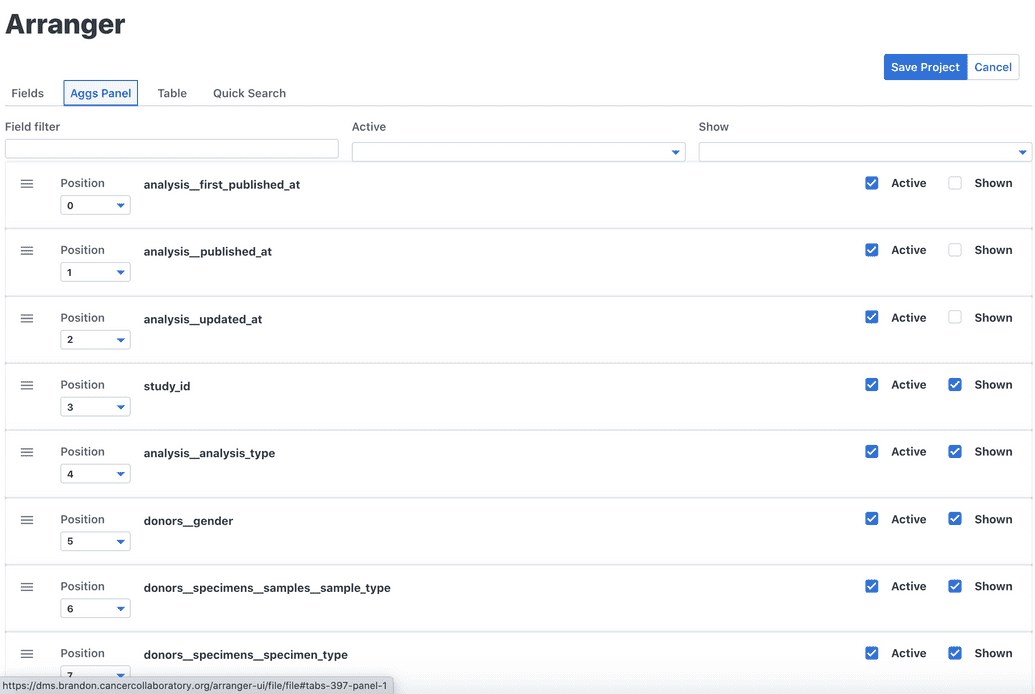
- Click the Aggs Panel tab. The list of all fields from your index mapping appears:
- For each field, you can configure the following as you deem necessary:
| Config | Description |
|---|---|
| Position | Indicates the position in the facet panel that the field appears. 0 represents the top-most position. You can use the drop-down to specify the position or drag-'n-drop the field in the Admin UI. |
| Active | If enabled, the field can be viewed in the facet panel, but does NOT display by default. |
| Shown | If enabled, the field will display by default in the facet panel. This can only be enabed if Active is also enabled. |
- Click Save Project.
Configuring the Results Table
The results table is the UI control in the data portal where the search results appear. Here is an example from a demo portal:
To configure properties of the results table:
- Go to the Arranger Admin UI at
localhost:8080.
- From the Project versions list, click the project you wish to configure. A list of Elasticsearch indices associated to the project appears.
- Click the Elasticsearch index name you wish to configure.
- Click the Table tab. The list of all fields from your index mapping appears:
- For each field, you can configure the following as you deem necessary:
| Config | Description |
|---|---|
| Position | Indicates the position in the results table that the data column appears. 0 represents the top-most position. You can use the drop-down to specify the position or drag-'n-drop the field in the Admin UI. |
| Active | If enabled, the data column can be viewed in the results table, but does NOT display by default. |
| Shown | If enabled, the data column will display by default in the results table. This can only be enabed if Active is also enabled. |
| Sortable | If enabled, the results table will be sortable on the data dolumn. |
- Click Save Project.
Configuring Quick Search
Some portals may implement a global "quick search" feature that searches across multiple data entities. This is NOT to be confused with the individual quick search boxes in the facet panel.
The quick search feature currently only supports the following:
- Search and filter indexed entities by text only
- Only exact match supported (free-text search NOT currently supported)
- Only entities at root of the Elasticsearch mapping can be searched (i.e. only the root "object" and its "nested" fields)
To configure global quick search properties:
- Go to the Arranger Admin UI at
localhost:8080.
- From the Project versions list, click the project you wish to configure. A list of Elasticsearch indices associated to the project appears.
- Click the Elasticsearch index name you wish to configure.
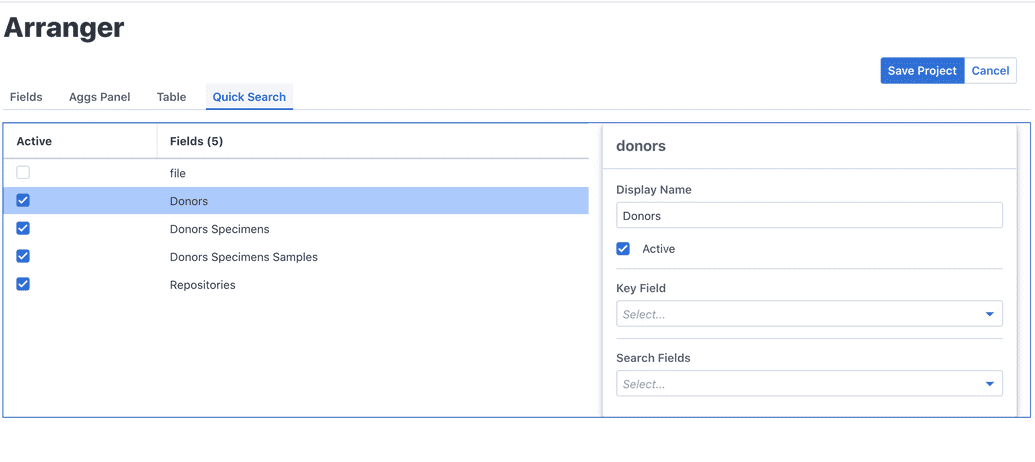
- Click the Quick Search tab. As indicated earlier ONLY entities at the root of the mapping ad their nested fields will appear:
- For each entity, you can configure the following as you deem necessary:
| Config | Description |
|---|---|
| Display Name | Name of the entity to display in quick search. We recommend you update these names, since otherwise, the default ES index entity name will appear. |
| Active | If enabled, the entity will be available for quick search. |
| Key Field | The field that unique identifies each instance of the entity. Select the correct field from the drop-down. |
| Search Field | A list of fields that the entity can be searched with. Select and add as many fields as required from the drop-down, one-by-one. |
- Click Save Project.
Exporting Your Project
You may need to export your project configurations for various reasons, such as:
- To simply backup your configs & metadata as good practice
- To re-use the configs in another Arranger instance or deployment
- To prepare for data migration
To export a project's configurations:
- Go to the Arranger Admin UI at
localhost:8080. - Click Export beside the project you need to export.
- Your browser will automatically download a ZIP file containing the project's configuration JSON files:
aggs-state.jsoncolumns-state.jsonextended.jsonmatchbox-state.json
Deleting a Project
You may need to delete a project occasionally as part of general cleanup. For example, perhaps you created multiple projects, but since only one can ever be active at a time, you want to clean up the old ones.
NOTE: Before deleting a project, make sure you wish to proceed with the operation because it is not reversible. We recommend you first backup the project configurations (see here) in case you ever need to re-create the project for any reason.
To delete a project:
- Go to the Arranger Admin UI at
localhost:8080. - Click Delete beside the project you need to export.
- Confirm the deletion.


